
In this tutorial, we will be working on a simple object detection dataset. We are creating a dataset that can be used to train a model to distinguish four similarly shaped screws against different backgrounds. We have a small set of real world data and we are looking to create new data using a simulation where the four different screws are dropped on different surfaces. We will use this simulation to create a training set for an object detection algorithm to identify specific screws on different backgrounds. You can download a version of the tutorial dataset here and the tutorial relationship and simulation files here.
For a more detailed description of the individual modules and how to use them, please refer to our documentation.
Prepare your 3D assets in Blender
Login to your Lexset account

Import 3D Assets
The 3D Assets tab is where you will bring all of the 3D assets you will use in your simulation into Seahaven. Here, assets are separated into folders called collections. Each collection should be composed of files you would wish to sample from.
The collections for this tutorial are pre-populated in your Lexset account. You will see four collections titled screw_1 screw_3 screw_6 screw_8 with the corresponding blend files located in each collection.
The Collection is available for placement in the Relationship Editor
Create a color map
From the 3D Assets tab you will next be moving onto the Colormap Editor tab. In Seahaven you must define a color map before you start generating data.

For this dataset we made four categories: one for each of each type of screw we want to annotate in our dataset.
Relationship Editor
The relationship file for this tutorial is pre-populated in your account and is available for use in the Load Relationship module in your simulation as DropScrewsToFloor.yaml. You can also download them from github.
To make your own relationship file:
Navigate to the Relationship Editor tab.
Create a relationship workflow: From the Workflow menu, select the Workflow and bring it into the work space. Next, bring in the Relationship module. The Relationship module is used to place collections of 3D assets into the scene and to define their relationship to other objects using a parent/child system. Bring your Relationship module into the Workflow bay.

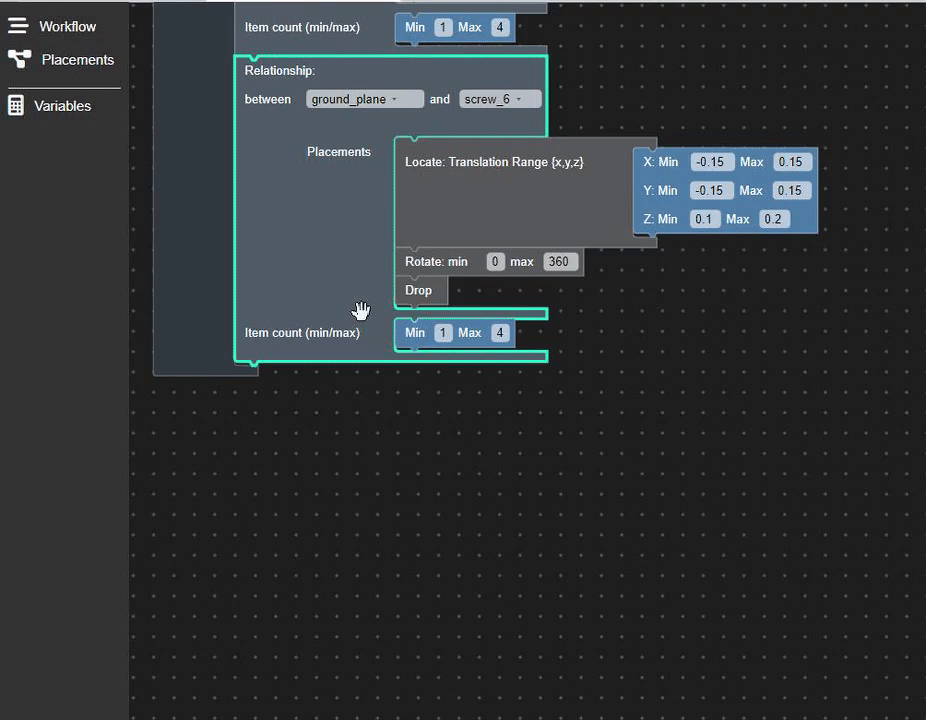
Define a relationship: The top two drop down menus in this module are used to define the parent/child relationship. In the box on the left select the name of the parent object, and the box on the right should have the name of the child object. For this dataset you will want to pair each collection of screws with a ground plane, where the ground plane is the parent and the screw collection is the child.

Configure the defined relationship:
The Placement bay is where you will be placing the Placement modules, which specify the configuration of the relationship between the parent and child object.

Use item count to designate the range of how many instances of a given 3D model may appear in a scene. Use a min/max value to determine how many screws to be sampled from the collection. Suggested amount is 1-4
Bring the Locate module into the Placements bay. This module is used for designating the range of placement in the scene via a vector.

Place the screws a small distance away from the ground plane as they can be dropped with the Drop module.


Other modules you may want to use here are:
Rotate: use the rotate module to give the screws a rotation range. We selected a range of 0 to 360 degrees
Drop: This will ray-cast the screws onto the z-axis, allowing them to sit correctly on the ground plane.
Copy and paste the relationship module for the other screws in the dataset. The pasted relationship will have the same configuration, so you will only need to change the parent and child objects.
Simulation Editor
Navigate to the Simulation Editor tab. Here you will use the 3D assets and relationships you’ve just made to create the scene, define the camera and its positioning, and determine the annotation outputs you wish to include in your dataset.
This workflow is separated into five bays: Scene, Relationships, Camera, colormap, Additional Output and Resolution. You will use each of these to define the makeup of your dataset

In the Scene bay, bring in the ground plane and lighting. Here we will be using the HDRI module and the Ground Plane module. The HDRI module creates an HDRI to use for background and lighting, while the Ground Plane module generates a ground plane for our objects to rest on. Our ground plane is set to 10m, and we will be using the “Abandoned” HDRI from the drop down menu.

Use the Relationship module in the Relationships bay to select the relationship you created earlier and load into the simulation.

Next define your camera using the Camera bay. For this dataset we will be using the Cubic Translation module to give a small amount of translation and rotation to our camera around a 3D bounding box. Be sure not to allow your camera to translate larger than a selected ground plane.

Under properties bay, bring in the FOV module to define the camera's field of view. For this dataset we set it to .5.
Under the Color Map bay, bring in the Color Map module from the Output menu. Select the colormap you made previously.
The additional output bay is where you will place other optional types of outputs not included in standard COCO format. Today, you will find a Depth Map module you can add. For other available outputs contact Lexset at info@lexset.ai.
Select the desired pixel resolution for your rgb data. For this dataset we are choosing a 512px resolution:

Name your dataset, give it a description, and choose the number of datapoints you wish to output (between 1 and 5000) for this dataset we are creating 1000. Select create simulation:

Navigate to the Simulation Manager tab. Here you will see your simulation in the queue:
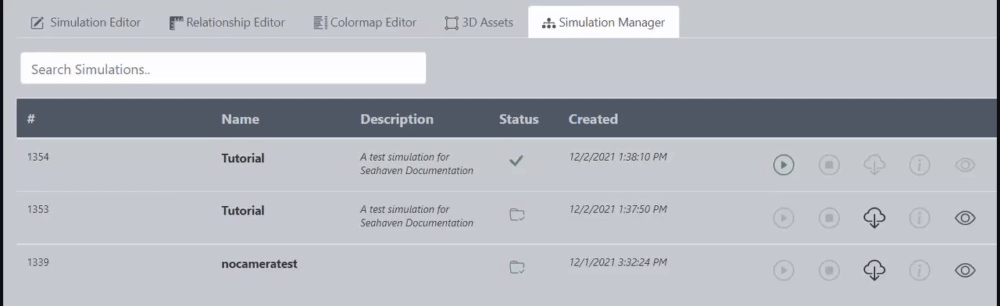
Click the play button to start your simulation.

By clicking the eye icon you will now be able to see the simulation running and generating your dataset. You can download the dataset here.
This dataset was created for training an object detection model to accurately detect four separate screws. This is one small example of the many ways Lexset synthetic data can be created and used. Similar datasets can be created for object detection models for all sorts of tasks like production line object orientation, pedestrian detection, object counting and many more. Lexset also creates complex data from human beings to satellite imagery using complex sensors.
The data that Lexset creates is fast, high quality and customizable to the needs of your project or model. This ensures that engineers are able to get more accurate models by focusing on training rather than time consuming dataset acquisition. To learn more about dataset creation, please visit our documentation or reach out to us at info@lexset.ai.
Comments